Establishing reliable communication between Zelio SR3B261BD and HMISTO715 can seem tricky, especially when dealing with different connector types. This detailed guide will help you understand how to set up Zelio SR3B261BD Serial Communication with HMISTO715 using the SR2CBL09 cable and a proper RS-232C wiring method.
🧩 Understanding the Components
1. Zelio SR3B261BD:
A smart logic relay from Schneider Electric used for small automation tasks. It supports RS-232C serial communication for connecting to HMIs or PCs.
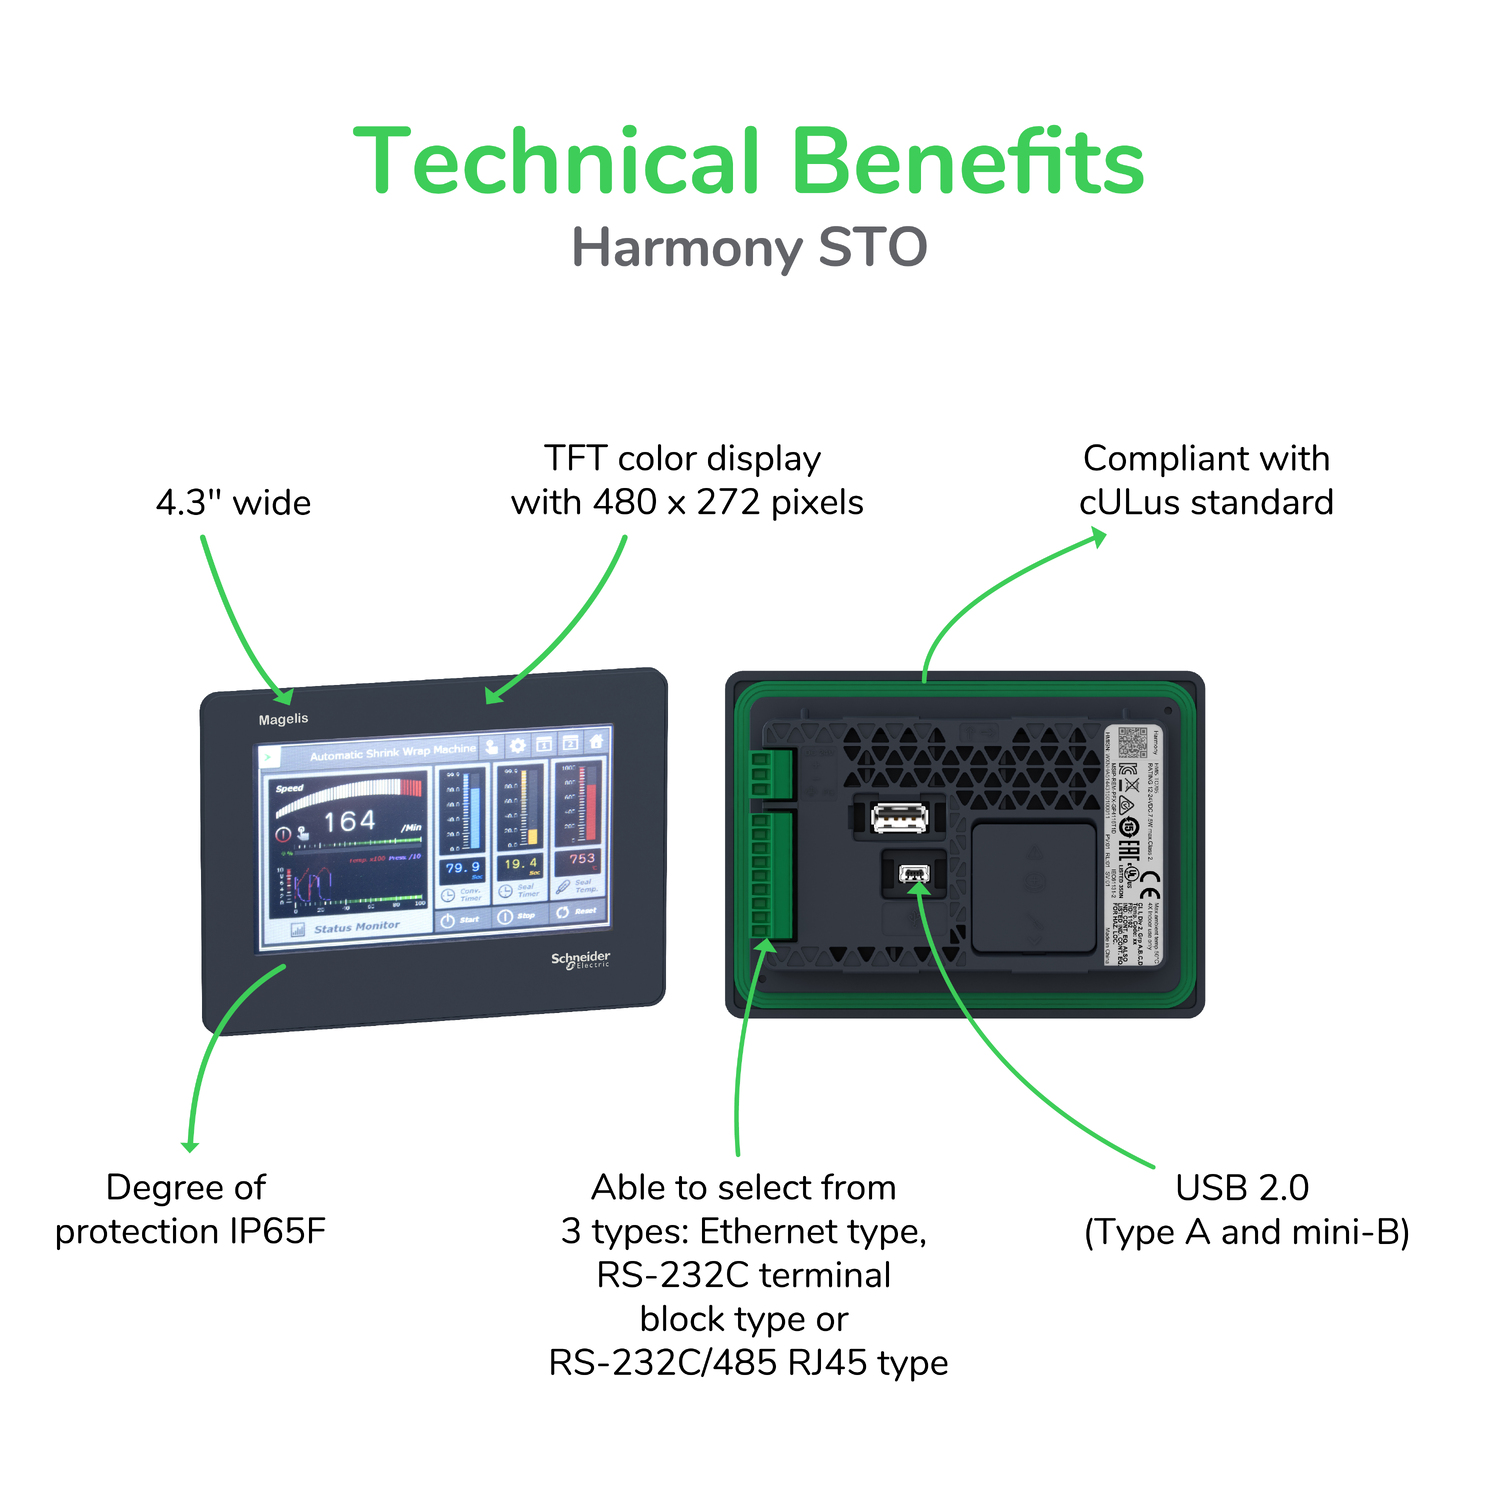
2. HMISTO715 HMI:
A touchscreen human-machine interface (HMI) designed to monitor and control automation processes. It comes with an RJ45 serial port for communication.
3. SR2CBL09 Cable:
A communication cable for Zelio Logic relays, equipped with a 9-pin (DB9) terminal block, typically used for serial communication.
The challenge arises because the SR2CBL09 cable ends in a 9-pin connector, while the HMISTO715 uses an RJ45 port. Let’s see how to bridge this difference effectively.
⚙️ How to Connect Zelio SR3B261BD to HMISTO715
To make Zelio SR3B261BD Serial Communication with HMISTO715 work properly, you’ll need to convert the 9-pin DB9 connector to an RJ45 interface. Here’s how to do it step-by-step:
Step 1: Identify RS-232C Pins on SR2CBL09
- Pin 2 → TX (Transmit)
- Pin 3 → RX (Receive)
- Pin 5 → GND (Ground)
Step 2: Check HMISTO715 RJ45 RS-232 Pinout
Typically, for Schneider HMIs:
- Pin 3 → RX (Receive)
- Pin 4 → TX (Transmit)
- Pin 5 → GND (Ground)
Step 3: Match the Connections
Use an RJ45 male connector or adapter to create this mapping:
- SR2CBL09 Pin 2 (TX) → RJ45 Pin 3 (RX)
- SR2CBL09 Pin 3 (RX) → RJ45 Pin 4 (TX)
- SR2CBL09 Pin 5 (GND) → RJ45 Pin 5 (GND)
Step 4: Verify Communication Settings
Configure both devices with the same serial parameters:
- Protocol: RS-232C
- Baud Rate: 9600 bps
- Data Bits: 8
- Stop Bit: 1
- Parity: None
After proper wiring and configuration, the Zelio relay should communicate successfully with the HMI.
🔍 Troubleshooting Tips
If communication fails after setup:
- Ensure TX and RX lines are not swapped.
- Confirm that both devices share the same baud rate.
- Check that your ground connection is solid and continuous.
- Test your cable using a USB-to-RS232 converter on a PC with terminal software (like Modbus Poll) to confirm data transfer.
⚡ Recommended Best Practices
- Always cross-check the RJ45 pinout in the HMISTO715 manual.
- Keep the cable length under 15 meters to maintain stable RS-232C signals.
- Use high-quality connectors to reduce electrical noise or interference.
- Label cables to avoid confusion during maintenance.
✅ Key Takeaways
- Zelio SR3B261BD Serial Communication with HMISTO715 uses the RS-232C protocol.
- The SR2CBL09 cable must be adapted from DB9 to RJ45 for compatibility.
- Proper pin mapping and matching serial settings are essential for stable data exchange.
- Testing your setup before final deployment ensures error-free operation.
🧠Conclusion
Setting up Zelio SR3B261BD Serial Communication with HMISTO715 is simple once you understand the correct pin mapping and communication parameters. By converting the SR2CBL09’s 9-pin connector to RJ45 and configuring both devices to RS-232C standards, you can achieve smooth data transmission between your Zelio logic relay and HMI — making your automation system more efficient and reliable.