Dragging files into a server shouldn’t feel like defusing a bomb. Still, the first time you try digitalocean filezilla, it’s easy to pick the wrong protocol and hit a wall.
Here’s the key point: a typical DigitalOcean Droplet doesn’t use plain FTP. Instead, you connect with SFTP (over SSH), which encrypts your login and transfers.
By the end, you’ll have a working FileZilla SFTP connection to your Droplet, you’ll be able to upload and download files, and you’ll know the quick safety checks that prevent the most common mistakes.
Before you connect, get the right details from your Droplet
FileZilla can only connect if you bring the right “ingredients.” Gather these first:
- Droplet public IP address (from the DigitalOcean control panel)
- SSH username (
rootor, better, a non-root user you created) - Authentication method: a password or an SSH key pair
- SSH port: usually 22, unless you changed it
Also, confirm the Droplet is running and that SSH is reachable. If you can’t SSH into the server, FileZilla won’t work either. DigitalOcean maintains a solid refresher on what SFTP is and how it works in their updated guide, SFTP basics for secure file transfers.
SSH keys deserve a quick callout. Passwords can be guessed or sprayed across the internet. Keys are harder to brute force because the private key never leaves your device. As of 2026, most hardened setups prefer keys, and many disable password logins entirely.
Use a non-root user so one mistake doesn’t wreck your server
Logging in as root is like doing electrical work with the breaker on. It’s powerful, but errors get expensive fast.
A safer goal is simple: use a limited user for uploads and edits, and only use sudo when you must. In practice, you create a normal user, add it to the sudo group, then use that account in FileZilla. That way, an accidental drag-and-drop won’t overwrite system files.
If you already have a non-root user, use it. If you don’t, create one before you start moving production files around.
Password vs SSH key in FileZilla, which should you pick?
Use SSH keys when possible. They’re safer and they scale better if you manage more than one Droplet.
Choose a password only if you need a quick setup and you’re sure password login is enabled. Even then, keep the password long, unique, and stored in a password manager. If your server rejects a correct password, it often means SSH is configured to allow keys only.
Set up DigitalOcean FileZilla SFTP in under 10 minutes
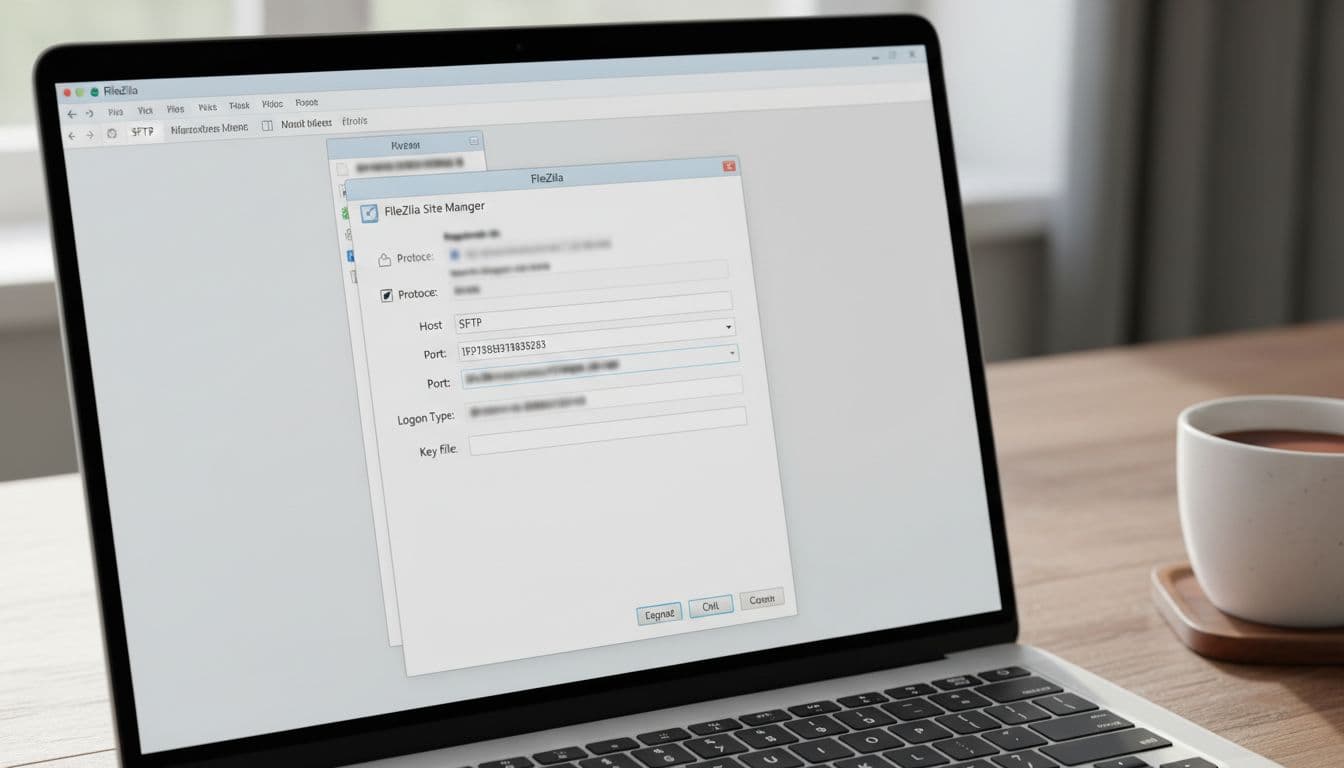
FileZilla’s interface looks busy, but you only need a few fields. Start in FileZilla Site Manager, create a new site, then fill it in like this:
- Open FileZilla, then go to File, Site Manager.
- Click New site and name it (for example, “DO Droplet”).
- Set Protocol to SFTP – SSH File Transfer Protocol.
- Set Host to your Droplet’s public IP address.
- Set Port to 22 (unless you changed SSH).
- Pick Logon Type:
- Normal if you use a password
- Key file if you use an SSH private key
- Enter User (your non-root username, or
rootif you must). - Click Connect.
The first time you connect, FileZilla prompts you to trust the server’s host key. Don’t click through on autopilot. Verify you’re connecting to the expected IP, then accept and store the key.
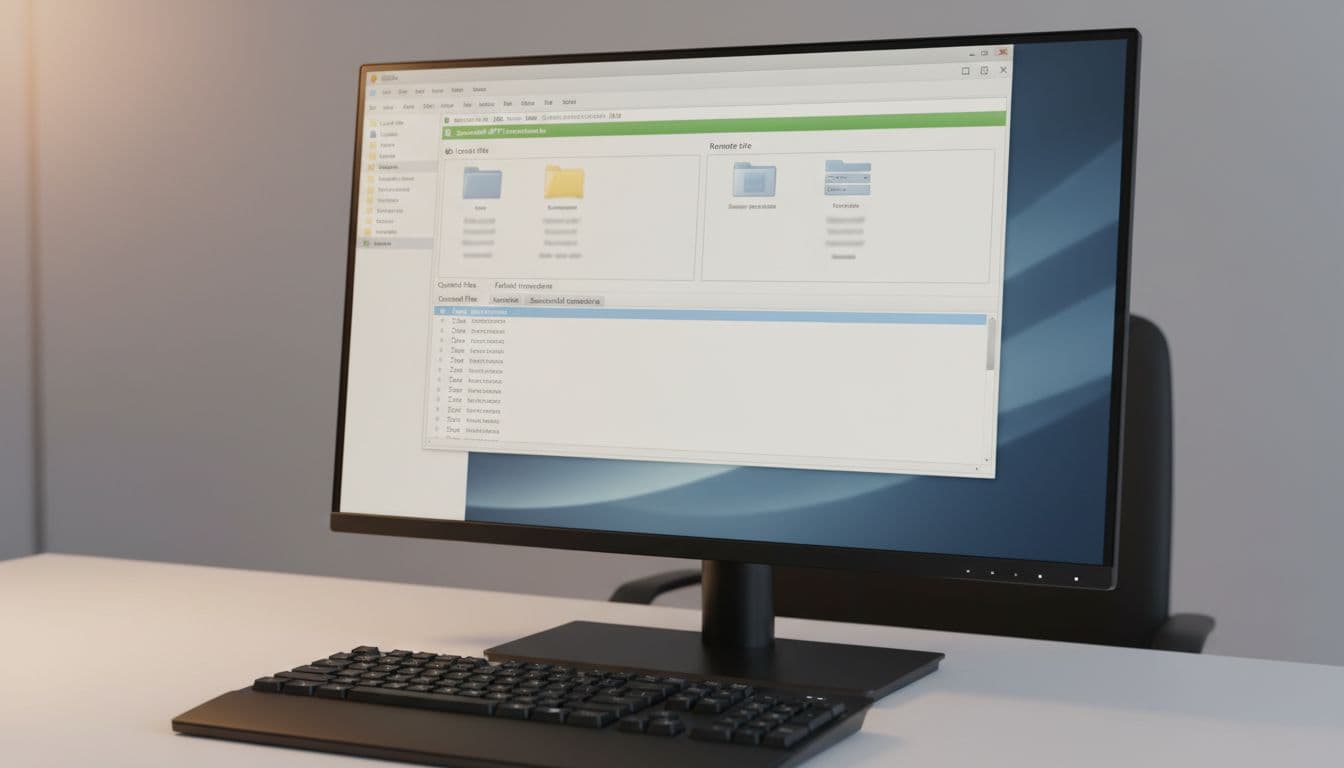
Success looks like this: your local files appear on the left pane, and the remote server directory appears on the right. If the right side stays blank, focus on authentication and permissions.
If you meant to use SFTP, don’t pick any “FTP” option in FileZilla. Standard Droplets expose SSH, not an FTP daemon.
Site Manager settings that work for most Droplets
These settings cover most DigitalOcean Droplets:
- Protocol: SFTP (SSH File Transfer Protocol)
- Host: Droplet public IP
- Port: 22
- Logon Type: Normal (password) or Key file (SSH key)
- User: your non-root user (preferred), or
root(not recommended)
If you want DigitalOcean’s official checklist, their documentation has a focused walkthrough, transferring files to Droplets with FileZilla.
Add your SSH private key to FileZilla without confusion
Key-based login fails most often for one simple reason: FileZilla can’t use the key format you selected, or you picked the wrong file.
In FileZilla, you can either:
- Add the key in Settings, SFTP (key manager), or
- Set Logon Type: Key file and browse directly to the private key
Make sure you select the private key file (often in ~/.ssh/, like id_ed25519 or id_rsa). The matching public key must exist on the server in ~/.ssh/authorized_keys for that user.
On Windows, key format can trip you up. If FileZilla rejects the key, convert it to a compatible format using a trusted tool (many admins use PuTTYgen), then re-add it in FileZilla and try again.
Upload and manage files without breaking permissions or your website
Once connected, FileZilla feels like a two-pane file browser:
- Left pane: your computer
- Right pane: your Droplet
Where should you upload files? It depends on your stack. For example, many Apache installs use /var/www/html, while some Nginx setups use /var/www/your-site. App platforms and Docker-based layouts can look completely different. If you’re unsure, confirm the path in your web server config before moving files.
Permissions matter because SFTP follows Linux ownership rules. If you connect as a non-root user, you might not be able to write into system-owned directories. That’s normal and safer than giving write access everywhere.
Also, show hidden files when needed. Many important files start with a dot (like .env). Don’t overwrite configs blindly, especially on production.
A simple upload workflow that prevents “oops” overwrites
When you’re updating a site or app, slow down for 30 seconds and use a repeatable flow:
- Download a backup copy of the file or folder you’ll change.
- Upload new files to a temp folder first (for example, inside your home directory).
- Compare file sizes and timestamps before replacing anything important.
- Use FileZilla’s Transfer queue and Failed transfers tabs to confirm nothing got skipped.
- Test the site or restart the service (if your change requires it).
That routine sounds boring, but it prevents the classic “worked on my laptop” outage.
Fix “Permission denied” and “Directory listing failed” errors
These errors usually come from one of three issues:
- You logged in as the wrong user (for example,
rootvs your limited user). - You’re in the wrong path (a directory that user can’t access).
- The folder has ownership or permissions that block writes.
First, confirm you’re uploading into a directory you own, like /home/youruser/. Next, decide whether the target directory should be writable by your user. If it should, fix ownership on the server carefully (often with sudo chown, used sparingly). If it shouldn’t, keep uploads in your home directory and deploy using a safer method.
Troubleshoot the most common DigitalOcean FileZilla connection problems
When digitalocean filezilla won’t connect, treat it like a network problem first, then an auth problem. A quick terminal test helps you separate “server access” from “FileZilla settings.”

Here’s a skimmable map of the usual issues:
| Problem in FileZilla | Likely cause | What to check first |
|---|---|---|
| Connection timed out | Wrong IP, Droplet off, port 22 blocked | Droplet status, IP, firewall rules |
| Connection refused | SSH not listening on that port | Port number, SSH service status |
| Authentication failed | Wrong user, wrong password, password login disabled | Username, auth method |
| Key refused | Wrong key file, key not installed, format mismatch | Private key, authorized_keys |
| Slow transfers | High latency, packet inspection, local Wi-Fi | Try wired, reduce parallel transfers |
When FileZilla times out, check SSH and firewalls first
Timeouts usually mean traffic can’t reach port 22. Start with the basics in order:
- Confirm the Droplet IP is correct.
- Confirm the Droplet is running in the control panel.
- Try SSH from a terminal (
ssh user@ip) from the same network. - Check firewalls: UFW on the Droplet and any DigitalOcean Cloud Firewall rules.
After you restore access, tighten it back up. Limit SSH to your IP when possible. If you want a plain-language SFTP walkthrough from another source, see a quick SFTP connection example with a Droplet.
When authentication fails, it’s usually one of these small mistakes
Auth errors feel vague, but the root cause is often simple:
- Wrong username (mixing up
rootand your non-root user) - Wrong password, or password login disabled in SSH settings
- Selecting the wrong key (public key instead of private key)
- Public key missing from
~/.ssh/authorized_keysfor that user - Key format not accepted by FileZilla
Fix one variable at a time. If SSH works in a terminal but FileZilla fails, the issue is almost always in Site Manager fields or key selection.
Conclusion
A working DigitalOcean FileZilla setup comes down to a few basics: use SFTP, enter the right Site Manager fields, and prefer SSH keys over passwords. When something breaks, test SSH first, then check firewalls and user permissions.
Next steps: create (or switch to) a non-root user for day-to-day work, restrict SSH to your IP, and take a Droplet snapshot before big changes. That way, file transfers stay routine instead of stressful.